Importing Custom Product Slugs / Permalinks into WooCommerce
NOTE: If you’re not a developer skip to the end to download the plugin that will let you add a “slug” column to the WooCommerce importer tool.
Recently I was tasked with transferring a few hundred products from an older e-commerce platform to WooCommerce. Thankfully WooCommerce provides a mechanism for importing products that are listed in a CSV file format.
The process ended up being fairly straight forward:
- Execute an SQL query on the older e-commerce platform to get a list of products and their attributes
- Export this list to a CSV file
- Write a script (I used Ruby) to convert the above exported CSV into a WooCommerce CSV format. You can see the WooCommerce CSV file specifications here.
- Upload all product images
- Import the newly converted CSV file into WooCommerce using the builtin WooCommerce product import tool
While the above steps are certainly interested and probably deserve an article of their own this is not what this post is about..
The WooCommerce CSV file format does support most product properties, but for some unknown reason it does not support the individual product Permalink (also known as “Slug”) property. If you’re not sure what I’m talking about, the Permalink is the custom url that you give your product.
For example: http://www.mysite.com/products/**my-custom-permalink.**
Custom permalinks are a must for any site, especially e-commerce, so that we don’t end up with product urls like this: http://www.mysite.com/?p=324234
So it is very surprising that the WooCommerce team did not include permalink importing. If you’re importing a store with a few thousand products do they expect us to go in and manually edit the permalink property of each product?
Luckily WooCommerce does provide us with a nice API for adding custom properties to import from the CVS file. With the API we can customize the Product Importer tool to add the properties that we are missing. The documentation is available here.
I used the API to add a “Slug” property support to the importer tool.
Additionally I added a “Slug” column to my CSV file, and adjusted my converter script described above to make sure the custom permalinks from the old e-commerce platform were under the “Slug” column in the newly generated CVS file.
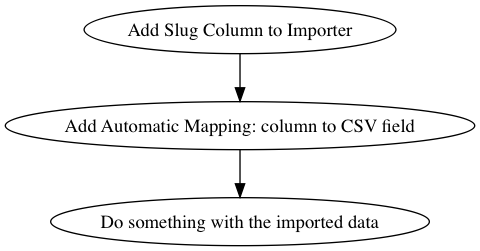
Now let’s get to the code. Creating a custom “Slug” import column requires the following steps:
- Add the new ‘Slug’ column to the importer internal data structure
- Add the new column to the Importer GUI Automatic Mapping screen. This is the screen that lets users visually map CSV columns to WooCommerce product data fields. This step is optional.
- Process the data that you imported. This is where you actually decide what to do with your newly imported data. In our case, use the data to update product Slug.

WooCommerce provides filter hooks to accomplish each of the above 3 steps. As with all Wordpress hooks and custom code, our code will go to in the functions.php file.
Add the Slug column to the Importer
Here is the code to add a “Slug” column to the Importer tool. It will then recognize a “Slug” column in your CSV files, but won’t know what to do with it just yet.
function add_column_to_importer( $options ) {

  // column slug => column name
  $options['slug'] = 'Slug';

  return $options;
}
add_filter('woocommerce_csv_product_import_mapping_options', 'add_column_to_importer');
Add Automatic Mapping: column to CSV field
function add_column_to_mapping_screen( $columns ) {

  // potential column name => CSV column slug
  $columns['Slug'] = 'slug';

  return $columns;
}
add_filter('woocommerce_csv_product_import_mapping_default_columns', 'add_column_to_mapping_screen');
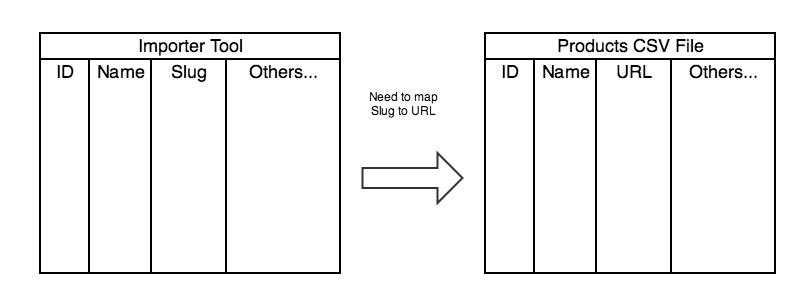
This part confused me at first. What it does is map the new column that we just added to the Importer tool, to a column in your CSV file.
In my case, since I created a “Slug” column in the importer tool, and also identically named “Slug” column in my CSV file this step was completely unnecessary.
However if the names do not match, you need to create a mapping.
Hopefully this diagram illustrates this point a little better.

Process the Imported Data
At this point the importer can pick up the new “Slug” field from the CSV file, and now we need to actually update our product with this slug.
I was worried that this might get tricky, however going through the WooCommerce source code I discovered that the slug updating functionality is already baked into WooCommerce with an easy to use set_slug method. Let’s see the code.
function process_import( $object, $data ) {

  if (!empty($data['slug'])) {
    $object->set_slug($data['slug']);
  }

  return $object;
}
add_filter('woocommerce_product_import_pre_insert_product_object', 'process_import', 10, 2);
The process_import function will run on every row imported from our CSV file. After the row gets parsed and matched up with the Importer’s columns it get’s stored in the $data object, where the column names are the keys into the object. So $data[‘slug’] would give you the value of the slug in the current row being processed.
$object referes to the WC_Product object. WooCommerce uses WC_Product instances to handle individual product data.
WC_Product has a nice
set_slug(string $slug)
method that will set our slug for us.
Source Code
If you’d like to see the completed source code, it is available on my GitHub page as a plugin.
Plugin Download
If you simply want to add Slug importing functionality to your WooCommerce store, download the plugin below.