Creating a YouTube AngularJS Directive
Here is how most people add a YouTube player to their website:
<iframe id="player" type="text/html" width="640" height="390"
  src="http://www.youtube.com/embed/M7lc1UVf-VE?enablejsapi=1&origin=http://example.com"
  frameborder="0">
</iframe>
To me that looks ugly, complicated, and not very semantic.
Wouldn’t it be better if we could embed YouTube with a more simple and expressive way, such as:
<youtube width="640" height="390" videoid="M7lc1UVf-VE"></youtube>
Well this is exactly what we will accomplish by building an AngularJS YouTube directive.
First head out to google development docs and look up the programmatic way of embedding YouTube using javascript.
This is how a simple YouTube player is embedded:
<html>
  <body>
    <!-- 1. The <iframe> (and video player) will replace this <div> tag. -->
    <div id="player"></div>

    <script>
      // 2. This code loads the IFrame Player API code asynchronously.
      var tag = document.createElement('script');

      tag.src = "https://www.youtube.com/iframe_api";
      var firstScriptTag = document.getElementsByTagName('script')[0];
      firstScriptTag.parentNode.insertBefore(tag, firstScriptTag);

      // 3. This function creates an <iframe> (and YouTube player)
      //    after the API code downloads.
      var player;
      function onYouTubeIframeAPIReady() {
        player = new YT.Player('player', {
          height: '390',
          width: '640',
          videoId: 'M7lc1UVf-VE'
        });
      }
     </script>
  </body>
</html>
The javascript replaces the div with id=”player” with an iframe based YouTube player.
The function
onYouTubeIframeAPIReady()
is attached to global Window object. This is where you specify the YouTube player settings and any callbacks for control (start, stop, etc…) and status (playing, stopped, current position, …). The full list of settings can be found in the documentation.
Now the challenge is to take the code above and insert it into an angular directive. This is not very difficult to do.
We begin by creating a basic Angular app called YouTubeApp.
var ytApp = angular.module('YouTubeApp', []);
We are now ready to start building our youtube directive:
ytApp.directive('youtube', function($window) {
  return {
    restrict: "E",

    template: '<div></div>',

    link: function(scope, element, attrs) {
      var tag = document.createElement('script');
      tag.src = "https://www.youtube.com/iframe_api";
      var firstScriptTag = document.getElementsByTagName('script')[0];
      firstScriptTag.parentNode.insertBefore(tag, firstScriptTag);

      var player;

      $window.onYouTubeIframeAPIReady = function() {
        player = new YT.Player(element.children()[0], {
          height: '390',
          width: '640',
          videoId: 'M7lc1UVf-VE'
        });
      };
    },
  }
});
This creates a basic directive restricted to be an element. We will set the settings of our directive using element attributes (such as the id, weight and height attributes).
We will access the attributes by binding them to our directive’s scope. This is done using the “@” data binding strategy. Angular offers many ways in which to bind data between the directive and the view (and controller). The “@” databinding strategy offers one-way databinding. That is, whenever the data is changed in the view (the view is the html), it will be automatically updated in our javascript (in the local scope object). However please note that this is “one-way” binding only, so changes we make in code inside our directive will not be reflected in the view. If we wanted to do two-way data binding, we would use the “=” databinding strategy.
We adjust our derective with the new databinding:
ytApp.directive('youtube', function($window) {
  return {
    restrict: "E",

    scope: {
      height:   "@",
      width:    "@",
      videoid:  "@"
    },

    template: '<div></div>',

    link: function(scope, element) {
      var tag = document.createElement('script');
      tag.src = "https://www.youtube.com/iframe_api";
      var firstScriptTag = document.getElementsByTagName('script')[0];
      firstScriptTag.parentNode.insertBefore(tag, firstScriptTag);

      var player;

      $window.onYouTubeIframeAPIReady = function() {
        player = new YT.Player(element.children()[0], {
          height: scope.height,
          width: scope.width,
          videoId: scope.videoid
        });
      };
    },
  }
});
As you can see, we setup data binding for height, width, and videoId.
You should now be able to embed a youtube video with:
<youtube width="640" height="390" videoid="M7lc1UVf-VE"></youtube>
Need to add some additional options to the youtube player? I like to force my player to use html5, and use a light theme. You might also want your player to autostart. Fortunately the youtube api allows us to put our settings into a playerVars object when we initialize the player.
Here is the updated directive with some common options that I like to put on my player. As always you can look these up and many more in the documentation.
ytApp.directive('youtube', function($window) {
  return {
    restrict: "E",

    scope: {
      height:   "@",
      width:    "@",
      videoid:  "@"
    },

    template: '<div></div>',

    link: function(scope, element) {
      var tag = document.createElement('script');
      tag.src = "https://www.youtube.com/iframe_api";
      var firstScriptTag = document.getElementsByTagName('script')[0];
      firstScriptTag.parentNode.insertBefore(tag, firstScriptTag);

      var player;

      $window.onYouTubeIframeAPIReady = function() {
        player = new YT.Player(element.children()[0], {

          playerVars: {
            autoplay: 0,
            html5: 1,
            theme: "light",
            modesbranding: 0,
            color: "white",
            iv_load_policy: 3,
            showinfo: 1,
            controls: 1,
          },

          height: scope.height,
          width: scope.width,
          videoId: scope.videoid
        });
      };
    },
  }
});
And that’s it. Once again, embed with:
<youtube width="640" height="390" videoid="M7lc1UVf-VE"></youtube>
Did we go through all that trouble just to make our HTML a little prettier? No. Now that we have a directive we need to be able to control it externally. What good would our YouTube player be if we could not control it through our app. This is where things start to get fun…
Improving our YouTube directive
There are a lot of problems with our directive. Aside from having a nicer html markup we didn’t actually gain any new functionality.
Real Angular directives can bind their attributes to data that can be modified by other parts of the application.
What we want is to be able to set width, height, and videoid using databinding, and have it change in real-time. This is how typical Angular applications behave.
We want is to be able to do this:
<youtube width="{{yt.width}}" height="{{yt.height}}" videoid="{{yt.videoid}}"></youtube>
and then have our video change immediatly based on the values of yt.width, yt.height, and yt.videoid.
Watching for Changes
The YouTube API provides several ways for us to adjust the size of the video screen and the current playing video. Specifically, it is done by calling the setSize(), and cueVideoById() methods. These methods need to be called when one of our yt.width, yt.height, or yt.videoid data values get changed.
Inside our YouTube directive, we can watch for changes to our data, and run callbacks whenever this data changes.
For example, to watch for changes to the videoid attribute we use the $watch method.
Inside our link:{} method, in the YouTube directive, we add the following code:
scope.$watch('videoid', function(newValue, oldValue) {
  if (newValue == oldValue) {
    return;
  }

  player.cueVideoById(scope.videoid);

});
NOTE: The $watch method is given to us by Angular. It is available on a scope. In this case we are using it on a local scope (local to inside of our directive). However you can also use it on a global scope, called $rootScope.
In the example above, the
function(newValue, oldValue) {}
callback gets run whenever the ‘videoid’ object on our local scope gets changed. When this happens we call the
cueVideoById(scope.videoid);
on our local YouTube player object “player” by passing it the new updated videoid value. This causes our YouTube player to instantly change the currently playing video.
Note that the code:
if (newValue == oldValue) {
  return;
}
just makes sure that the value has in fact changed. This is necessary because when Angular runs for the first time it sometimes runs the callback with “undefined” values during the initialization stage. It’s a good idea to include this simple check whenever you watch for objects with the $watch method.
So now that we are watching for videoid changes, we should add some code to watch for width and height changes.
The code is very similar, but now instead we run the setSize(width, height) method on our player object.
We add to our directive’s link:{} method:
scope.$watch('height', function(newValue, oldValue) {
  if (newValue == oldValue) {
    return;
  }
  player.setSize(scope.width, scope.height);
});

scope.$watch('width', function(newValue, oldValue) {
  if (newValue == oldValue) {
    return;
  }
  player.setSize(scope.width, scope.height);
});
Or as shortcut, we can watch for both the width, and height values simultaneously with one $watch method.
Below is equivalent to the above, but makes our code cleaner:
scope.$watch('height + width', function(newValue, oldValue) {
  if (newValue == oldValue) {
    return;
  }
  player.setSize(scope.width, scope.height);
});
Putting everything together and we end up with the following directive:
ytApp.directive('youtube', function($window) {
  return {
    restrict: "E",

    scope: {
      height: "@",
      width: "@",
      videoid: "@"
    },

    template: '<div></div>',

    link: function(scope, element) {
      var tag = document.createElement('script');
      tag.src = "https://www.youtube.com/iframe_api";
      var firstScriptTag = document.getElementsByTagName('script')[0];
      firstScriptTag.parentNode.insertBefore(tag, firstScriptTag);

      var player;

      $window.onYouTubeIframeAPIReady = function() {

        player = new YT.Player(element.children()[0], {
          playerVars: {
            autoplay: 0,
            html5: 1,
            theme: "light",
            modesbranding: 0,
            color: "white",
            iv_load_policy: 3,
            showinfo: 1,
            controls: 1
          },

          height: scope.height,
          width: scope.width,
          videoId: scope.videoid,
        });
      }

      scope.$watch('videoid', function(newValue, oldValue) {
        if (newValue == oldValue) {
          return;
        }

        player.cueVideoById(scope.videoid);

      });

      scope.$watch('height + width', function(newValue, oldValue) {
        if (newValue == oldValue) {
          return;
        }

        player.setSize(scope.width, scope.height);

      });
    }
  };
});
Let’s add some simple HTML to try out our directive. For this example let’s assume that all of our javascript code is in application.js file.
<!DOCTYPE html>

<head>
  <title>YouTube Directive Example</title>
  <script src="https://ajax.googleapis.com/ajax/libs/angularjs/1.2.3/angular.min.js"></script>
  <script src="application.js"></script>
</head>

<body ng-app="YouTubeApp">
  <div ng-controller="YouTubeCtrl">

    <youtube width="{{yt.width}}" height="{{yt.height}}" videoid="{{yt.videoid}}"></youtube>

    <br />
    Width:<input type="text" ng-model="yt.width">
    Height:<input type="text" ng-model="yt.height">
    Videoid:<input type="text" ng-model="yt.videoid">

  </div>
</body>

</html>
You might have noticed that we put our youtube directive inside a controller called “YouTubeCtrl”. In Angular controllers are used to communicate with directives. They are the glue between the views (html) and the directives. In this case we are adding a controller so that we could set some default values for our YouTube player.
We will give the player a default width of 600, height of 480, and a videoid value of M7lc1UVf-VE.
Add the following to your application.js file:
  ytApp.controller("YouTubeCtrl", function($scope) {
    //initial settings
    $scope.yt = {
      width: 600,
      height: 480,
      videoid: "M7lc1UVf-VE",
    };

  });
Our example is now complete.
Try the live example here.
As you modify the input boxes, the YouTube player should instantly react. Take a look at the source code to see how it all fits together.
Adding Controls
We now have a functioning YouTube player that instantly responds to attribute changes. However our player would not be complete if we didn’t have a way to programmatically change its current state. We need to be able to issue basic media control commands such as PLAY, PAUSE, and STOP.
Listening for Events
Commands to our YouTube directive will be represented as events. The directive will listen for events and respond accordingly when an event that it recognizes occurs. This is similar to the way it $watch(ed) for changes to scope data.
We will define an Angular constant to represent the 3 control events that we will support. Add the following code at the top of your application, right below the ytApp initialization.
  ytApp.constant('YT_event', {
    STOP:            0,
    PLAY:            1,
    PAUSE:           2
  });
This defines an Angular constant called YT_event that can be set to either STOP, PLAY, or PAUSE. For example, we can check for a STOP event by comparing our incoming event to YT_event.STOP.
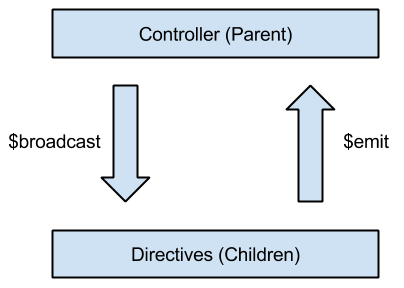
In Angular you can send an event from one place, and listen for it from another. A controller can send an event to its child directives. The directives can receive this event, and in turn send their own events back to the parent. This creates a communication channel between the parent and children. In this example we have a one-to-one communication, but it is perfectly possible to create many-to-many communication channels using events.
We send events using $broadcast, and $emit methods. Just like with $watch these are always used on the local or global scope. When you want to send an event from a parent to its children the $broadcast method is used. When you’re sending events from the children to their respective parents, the $emit method is used instead.
To listen for events we use the $on method on the scope.
Lets start adding code to make these concepts clearer. The first thing we’ll do is add code to our YouTube directive that will be able to listen for incoming control events, and then act accordingly.
Add the following to our directive’s link method, right below the previous $watch method that watched for changes to our videoid.
  scope.$on(YT_event.STOP, function () {
    player.seekTo(0);
    player.stopVideo();
  });

  scope.$on(YT_event.PLAY, function () {
    player.playVideo();
  });

  scope.$on(YT_event.PAUSE, function () {
    player.pauseVideo();
  });
As you can see there is nothing complicated about listening and responding to events. We are listening for STOP, PLAY, and PAUSE and then reacting by calling the appropriate methods from the YouTube API. The methods stopVideo(), playVideo(), seekTo(), and pauseVideo() are self-explanatory, and are well documented in the YouTube API documentation.
Here is the updated directive:
ytApp.directive('youtube', function($window) {
  return {
    restrict: "E",

    scope: {
      height: "@",
      width: "@",
      videoid: "@"
    },

    template: '<div></div>',

    link: function(scope, element) {
      var tag = document.createElement('script');
      tag.src = "https://www.youtube.com/iframe_api";
      var firstScriptTag = document.getElementsByTagName('script')[0];
      firstScriptTag.parentNode.insertBefore(tag, firstScriptTag);

      var player;

      $window.onYouTubeIframeAPIReady = function() {

        player = new YT.Player(element.children()[0], {
          playerVars: {
            autoplay: 0,
            html5: 1,
            theme: "light",
            modesbranding: 0,
            color: "white",
            iv_load_policy: 3,
            showinfo: 1,
            controls: 1
          },

          height: scope.height,
          width: scope.width,
          videoId: scope.videoid,
        });
      }

      scope.$watch('videoid', function(newValue, oldValue) {
        if (newValue == oldValue) {
          return;
        }

        player.cueVideoById(scope.videoid);

      });

      scope.$watch('height + width', function(newValue, oldValue) {
        if (newValue == oldValue) {
          return;
        }

        player.setSize(scope.width, scope.height);

      });

      scope.$on(YT_event.STOP, function () {
        player.seekTo(0);
        player.stopVideo();
      });

      scope.$on(YT_event.PLAY, function () {
        player.playVideo();
      });

      scope.$on(YT_event.PAUSE, function () {
        player.pauseVideo();
      });

    }
  };
});
Our directive is now fully controllable. Let’s add some buttons to the HTML that will trigger the controls.
Sending events
In order to control our player we will need to send it control events. These control events will be sent from our existing controller, YouTubeCtrl.
As previously noted sending events from the controller to it’s children on the scope, is done using the $broadcast method.
We add a method in the YouTubeCtrl that will send control events. Later on we will trigger this method with button presses.
The method that we will create will be called sendControlEvent(yt_event).
Here is the updated YouTubeCtrl code:
myApp.controller('YouTubeCtrl', function($scope, YT_event) {
  //initial settings
  $scope.yt = {
    width: 600,
    height: 480,
    videoid: "M7lc1UVf-VE"
  };

  $scope.sendControlEvent = function (yt_event) {
    this.$broadcast(yt_event);
  };

});
Now let’s add HTML to trigger this method based on various button presses. Let’s add three buttons to the HTML: Stop, Play, and Pause.
<!DOCTYPE html>

<head>
  <title>YouTube Directive Example</title>
  <script src="https://ajax.googleapis.com/ajax/libs/angularjs/1.2.3/angular.min.js"></script>
  <script src="application.js"></script>
</head>

<body ng-app="YouTubeApp">
  <div ng-controller="YouTubeCtrl">

    <youtube width="{{yt.width}}" height="{{yt.height}}" videoid="{{yt.videoid}}"></youtube>

    <br />
    Width:<input type="text" ng-model="yt.width">
    Height:<input type="text" ng-model="yt.height">
    Videoid:<input type="text" ng-model="yt.videoid">

    <!-- The Control Buttons -->
    <button ng-click="sendControlEvent(YT_event.PLAY)">Send Play</button>
    <button ng-click="sendControlEvent(YT_event.PAUSE)">Send Pause</button>
    <button ng-click="sendControlEvent(YT_event.STOP)">Send Stop</button>

  </div>
</body>

</html>
The above should work, but unfortunately it doesn’t. Can you see why? We are referring to YT_event inside the HTML, however when we’re inside our template(HTML) Angular only has knowledge of data that is attached to the scope. Once we attach YT_event to the local scope it should work.
Add the following to the YouTubeCtrl just above the sendControlEvent method definition.
$scope.YT_event = YT_event;
It should now work! You now have a fully controllable YouTube player.
See it in action here.
Adding Status
Before we conclude I’d like to add a final feature to our player. It would be great if our player could notify other parts of the application of it’s current status. For this demo our player will notify its parent whenever its status changes to “ENDED”, “PLAYING”, “NOT PLAYING”, and “PAUSED”.
The YouTube api offers a convenient way to determine when the state of the player changes. Previously we initialized our player by passing it various properties, such as size, and videoid. To watch for status changes we include another propery called “events”. The events is an object that is comprised of a list of events, and their callback functions to run when the respective events fire.
A code example should help explain this better. Inside the directive’s Link:
var player;
$window.onYouTubeIframeAPIReady = function() {

  player = new YT.Player(element.children()[0], {

    ...

    height: scope.height,
    width: scope.width,
    videoId: scope.videoid,

    events: {
      onStateChange: function(event) {

        console.log("STATUS CHANGED. New status: " + event.data);

      }
    }
  }
});
So whenever the “onStateChange” event fires we are notified. The “event” argument in our callback is described in the API documentation. We are especially interested in the “event.data” value which can be one of the following:
YT.PlayerState.ENDED
YT.PlayerState.PLAYING
YT.PlayerState.PAUSED
YT.PlayerState.UNSTARTED
YT.PlayerState.BUFFERING
YT.PlayerState.CUED
We will only focus on the first 4 states.
Let’s detect these states, and based on them send the appropriate message to any listening parent controllers. We will notify the parent of a status change by sending it a “STATUS_CHANGE” event, followed by a simple text string that will describe the event.
Back in our constant definition, add a new constant called STATUS_CHANGE.
var myApp = angular.module('YouTubeApp', []);

myApp.constant('YT_event', {
  STOP:            0,
  PLAY:            1,
  PAUSE:           2,
  STATUS_CHANGE:   3
});
Sending messages back to the parent controller is accomplished using the $emit method.
//...

events: {
  'onStateChange': function(event) {

    var message = {
      event: YT_event.STATUS_CHANGE,
      data: ""
    };

    switch(event.data) {
      case YT.PlayerState.PLAYING:
        message.data = "PLAYING";
        break;
      case YT.PlayerState.ENDED:
        message.data = "ENDED";
        break;
      case YT.PlayerState.UNSTARTED:
        message.data = "NOT PLAYING";
        break;
      case YT.PlayerState.PAUSED:
        message.data = "PAUSED";
        break;
    };

    scope.$emit(message.event, message.data);
  }
}

//...
In the above we create a plain object called message. This is so that our event STATUS_CHANGE and the message are nicely organized together. We then $emit the event “YT_event.STATUS_CHANGE”, and the string describing it up the scope chain.
Learning about $apply
The code above is almost complete. However if you were to use it you’d find that your messages would not be sent some of the times.
To fix it, the line:
scope.$emit(message.event, message.data);
needs to be wrapped inside a special angular $apply method, like this:
scope.$apply(function() {
  scope.$emit(message.event, message.data);
});
Allow me to explain… Angular does a lot of complicated work behind the scenes to make sure that data binding works without any special setup. Basically, Angular does this by checking which variables have changed by comparing their old and new values.
When does it do this comparison? It does it whenever you tell it to do it by calling $apply. This might seem confusing since until now you’ve had data binding working fine without needing to call $apply. This is because Angular calls $apply automatically behind the scenes when inside Angular specific code, such as inside of directives, controllers, and/or services.
However when we’re inside callbacks that are outside of the Angular world, we need to explicitly tell angular to check the values for changes. In the above we are running code inside the “onStateChange” callback, this callback is not related to Angular, so we use $apply to tell Angular to check for changes.
Please keep in mind that you do not always need to call $apply inside of non-angular callbacks. You only need to do it when you change scope values and want to inform Angular of this.
The code that changes the scope value is wrapped inside the $apply method, like this:
scope.$apply(function() {
   ..... // the code
});
Or you can do this:
... some code that changes the scope

scope.$apply();
The first way is prefered because it allows angular to capture, and handle exceptions and errors inside of its framework. The second way does not, and should be avoided.
Finalizing the Player
So our player $emits it’s status to the parent controller. Time to receive the status and update our view.
To keep things simple we’ll put a text string in our HTML file, inside the YouTubeCtrl controller. A simple <p> paragraph will work here.
Here is the final updated HTML:
<!DOCTYPE html>

<head>
  <title>YouTube Service Directive Example</title>
  <link rel="stylesheet" type="text/css" href="application.css">
  <script src="https://ajax.googleapis.com/ajax/libs/angularjs/1.2.3/angular.min.js"></script>
  <script src="application.js"></script>
</head>

<body ng-app="YouTubeApp">
  <div ng-controller="YouTubeCtrl">
    <youtube width="" height="" videoid=""></youtube>
    <br />
    Width:<input type="text" ng-model="yt.width">
    Height:<input type="text" ng-model="yt.height">
    Videoid:<input type="text" ng-model="yt.videoid">

    <br />

    <button ng-click="sendControlEvent(YT_event.PLAY)">Send Play</button>
    <button ng-click="sendControlEvent(YT_event.PAUSE)">Send Pause</button>
    <button ng-click="sendControlEvent(YT_event.STOP)">Send Stop</button>

    <!-- simple player status display -->
    <p>Player status is: {{yt.playerStatus}}</p>

  </div>
</body>

</html>
Finally, all we have left to do is listen for YT_event.STATUS_CHANGE events, and update the $scope.yt.playerStatus value, so that the view gets automatically updated.
Add the following to the bottom of the YouTubeCtrl controller:
//...
$scope.$on(YT_event.STATUS_CHANGE, function(event, data) {
  $scope.yt.playerStatus = data;
});
And we’re done! Our player is finally finished, and contains most of the basic functionality that you would expect from a video player.
Demo and Source
The final live demo is available here.
Full source is on github available here.
Final Thoughts… A broken player?
It might surprise you to learn that after all the work that we’ve put into our player, it is unfortunately broken.
What happens when you try to insert multiple <youtube> directives into the view?
Like this:
<youtube width="640" height="390" videoid="M7lc1UVf-VE"></youtube>
<youtube width="640" height="390" videoid="ZhfUv0spHCY"></youtube>
<youtube width="640" height="390" videoid="aGHzqwQU06g"></youtube>
You will not see three youtube windows as you’d expect. The first two directives will be ignored and only the last one will be displayed. This is because in each one of our directives we are overwriting the global onYouTubeIframeAPIReady function, as described above.
The good news is that it is possible to fix the player, however it will require some advanced techniques, such as the use of Angular Services, and Promises. This will be the topic of an upcoming article.
UPDATE: July 8, 2015
Take a look at the updated version of the demo that fixes the multiple players problem.